Note: Work through this entire page. Sections on this page include:
Wordpress is an open source content management software (CMS) that has become a very popular blogging platform. It can be downloaded and installed on servers belonging to individuals or organizations. For those who are interested in very technical details about installing Wordpress on a server, see Wordpress.org.
Wordpress blogs are also freely available through a hosted service at Wordpress.com (note that it's .com for the free hosted blog service as opposed to .org for the open source documentation).
Our school has its own Wordpress instance that you can use throughout your student career here at SJSU. You will set up a blog and use it not only in INFO 203 but also for INFO 200 and possibly for other classes. Or you may wish to set up new blogs for additional classes in the future.
An additional feature of our school's Wordpress instance is that it is using BuddyPress, a plug-in that adds social-networking features such as profiles, activity streams, and user groups.
Follow the steps below and you'll soon have your own new blog. Keep reading to the end of the page where you will learn how to post your first entry and create a link in your post as required for this unit's assignment.
Set up your new blog by following the steps listed on the page linked below. If you find it difficult to switch windows as you work from a list of instructions, you may wish to print the page. Be sure to note the link of your new blog and the username and password you set up. When you have completed the blog set-up process, return to this page.
See the two recommendations below before you set up your blog:
1) Find the RSS link (see first item below) before you change the theme of your blog (an optional activity).
2) If you use any of the following email providers, you should use your @sjsu.edu address when you set up your blog. The email providers listed below often do not deliver the important confirmation email from WordPress which you will need to complete the blog set-up process:
See information about setting up your SJSU email here: https://www.sjsu.edu/it/resources/faq/email/index.html
How to set up your blog: https://ischoolblogs.sjsu.edu/info/how-to/get-started/
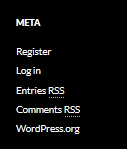
Look at the home page of your new blog. In the left or right menu area (depending on your blog's theme), you will see a "META" section that includes several important links. Right-click "Entries RSS" and copy the link address to capture the link of the RSS feed for the posts in your blog. Paste that link in a place where you can find it and use it for your assignment for this module.
Other items in this list:
The "Register" link returns you to the page where you first set up your blog. The "Log in" link takes you to your blog's dashboard which is required for the next step in this assignment. "Comments RSS" provides the feed for all comments that are posted as replies to your blog posts.
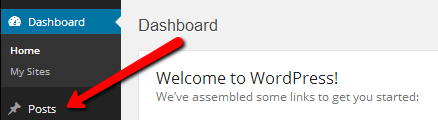
Add a new post to your blog by returning to the dashboard. Use the link you saved earlier or use one of the following methods:
If you are not currently logged in, you will need to log in.
How do I know if I'm currently logged into Wordpress?
Look at the upper right of the window. If you see a personalized greeting listed there, you are logged in.
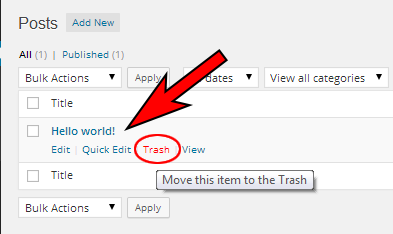
Delete the default "Hello World" post and then add your own new post to your blog.
In the left menu, click "Posts."
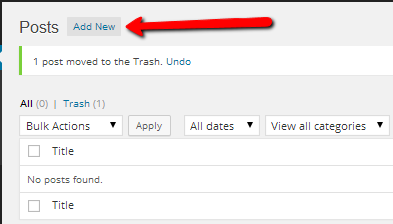
Here you can see a list of all the posts on your blog. The only one currently listed is the default Hello world which you should delete. Hover your mouse over that title and then click "Trash."
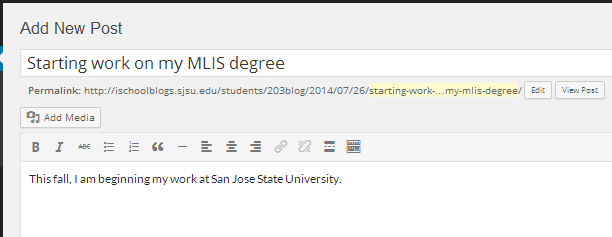
Next, click the "Add New" button at the top left of the page.
Add a new post by entering a title and then beginning your post in the text area below. Compose your message. You should occasionally use the "Save Draft" button in the upper right to save your work and avoid accidental loss of what you've written. (You can use the formatting toolbar and you can include images or other types of media by using the Upload/Insert icons.)
The assignment for this module requires that you include a working hyperink to your blog post. Continue to the section below to learn how to do this.
Begin by clicking and dragging to select the text you want to have linked. Then click the link icon.
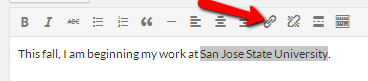
Enter the URL and click "Add Link."
The text will now display in a different color and will be a working link.
Learn more about creating links by viewing this support page at Wordpress.com: http://en.support.wordpress.com/links/
When you have completed your post, click the blue "Publish" button located on the right side of the screen.
![]()
To view your post, click the "View post" link located at the upper left of the "Edit Post" interface.
To edit, delete, or write new posts, return to your blog's dashboard and click "Posts."
The assignment for this module requires each student to post a comment on another student's blog. When someone posts a comment on your blog, it will not appear until you review and approve it (depending on your blog's settings). You should receive an email notification when someone submits a comment. Watch for these notifications and act on them promptly. The notification will come from SJSU School of Information and the subject line will say, "Please moderate" and will include the name of the post where the comment was entered. You can review the comment and approve or trash it by using the links in the email.
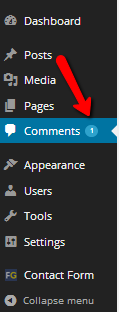
Alternatively, you can go directly to your blog's dashboard to moderate the comment. When a comment is submitted, you can see a notification in the dashboard under Comments.
 '
'
Hover the cursor over the new comment and options will appear where you can click to approve or discard.

You can easily change the design of your blog by trying out a new theme. The default theme is called "Twenty Fifteen." To see other themes, view your blog's dashboard and select Appearance > Themes.
There is so much you can do with Wordpress. In this course, we introduce you to just the basics. You will further develop your blog in INFO 200. See these additional helpful resources:
You can set up new blogs to serve different purposes while you are a student in the program.
1. Log into your WordPress user account at http://ischoolblogs.sjsu.edu/info/
2. Go to: https://ischoolblogs.sjsu.edu/info/sites/create/
3. You will be given the opportunity to create another site
Now it's time to return to the Info 203 site and continue with Unit 2.